35 Beachy Nail Designs for Instant Summer Vibes


Elizabeth Denton

The AC is blasting, pants have been banned from the wardrobe, and we’re covering every inch of skin in SPF—summer has officially arrived! This also means it’s time for the brightest, boldest manicures. Swap out your go-to nudes for something a little punchier, like, say a palm tree print or seashell designs. Yes, we’re going there. In honor of the season of sun, we’re serving up a host of colorful manis inspired by Mother Nature’s biggest gift for surviving the heat: the beach. Think: Tropical blues, pops of neon, and picnic-worthy nail art designs. Plus, they’re easy to DIY and won’t require a lengthy list of pro tools to pull off. In fact, you probably already have most of what you’ll need, like toothpicks, tape, and bobby pins.
To get the summer feels going, we tapped celeb nail artist Steph Stone for beachy nail designs that will have you (safely) booking it to the nearest body of water—coastal, poolside, or running through a sprinkler on your daily dog walks. But before we get to painting, let’s go over a few beach nail art basics that’ll set you up for success.
First, you’re going to want to prep by cutting and filing your nails to the same length and shape. Then, create a frame for your paintwork by cleaning up the cuticles by clipping any hangnails (no need to go crazy here—less is more). “So many people think they need to cut their cuticles when what they really need is some moisturizer. A light buff and a great cuticle oil goes a long way,” says Stone. Finally, wipe your nails with rubbing alcohol or acetone to remove any oils and extend the staying power of your polish. Now, get ready for an endless summer of beachy nail designs.


It's about glam time you treated yourself.
Beachy Nail Art Ideas to DIY
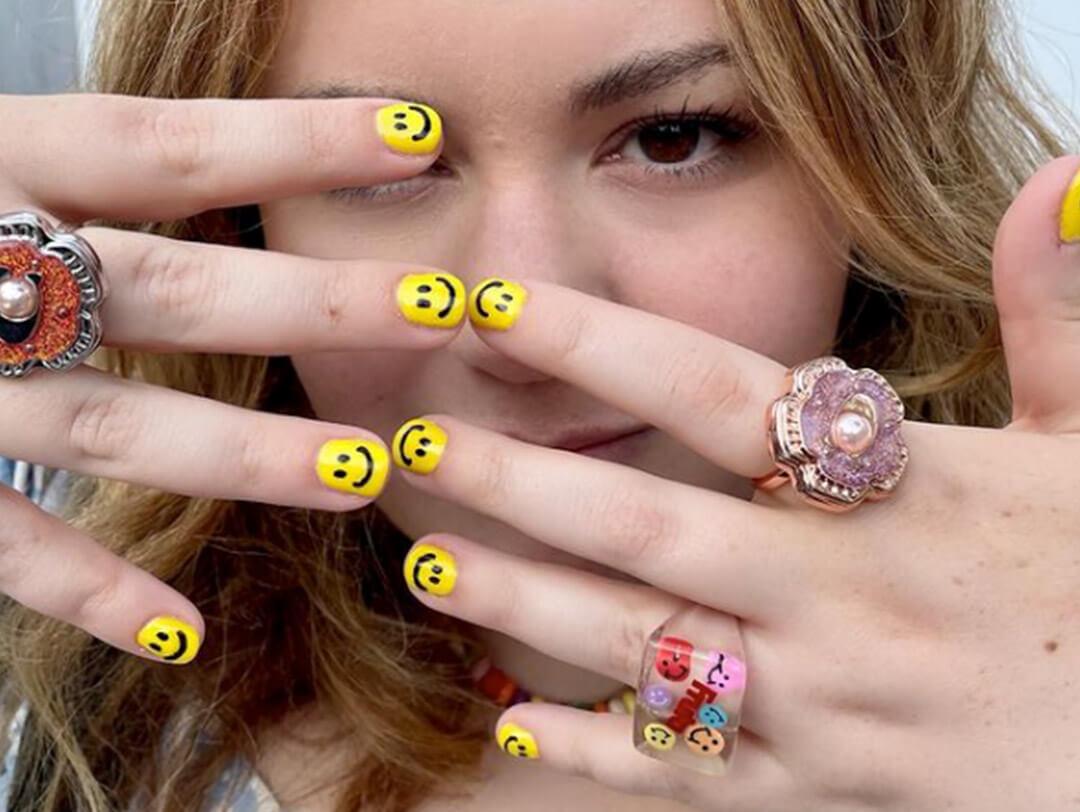
1. Smiley Faces
Sorry millennials—Y2K is back with a vengeance, including smiley face accessories. These cute nails are bright and sunny and will make you smile every time you look down. Smiles are an especially great nail art idea on short nails.
2. Mermaid Nails
acrylic nails give us serious mermaid vibes with the trendy mixed prints in ocean colors and 3D textures. We’re especially obsessed with the water effect tip. You might want to head to the nail salon for something this intricate, though.
3. Beach Towel Vibes
You don’t have to stick to the typical ocean nail colors for a beachy vibe. This orange manicure is sun-inspired while still being a cute nail art design for next season, too.
4. Starfish Nails
Is there anything beachier than starfish? These adorbs gel nails feature punchy colors like teal and orange. If you’re a DIY nail pro, you can paint starfish on with a skinny brush. But stick-on decals work just as well.
5. Glitter Nails
This starfish-emblazoned mani has that trendy glitter nail look with a glam take on French tips. There’s a lot of summer nail art ideas in one manicure but it somehow really works. The gold glitter is an extra fun touch.
6. French Tip Twist
If ocean themed nails feel a little too bold, try painting the designs just on the tips of each nail. It’s a bit more laid-back but still seriously beach ready.
7. Ombre Nails
Sure, ombre nails make the best nails all year round but with the addition of palm trees, this set becomes instantly vacation-ready. Are they decals? Stickers? Drawn by hand? Either way, we’re in love.
8. Mermaid Pedicure
When you’re hanging out on the beach, you’re going to get an up-close-and-personal look at your toenails. One-up your usual pedicure with a fun summer nail art design like these colorful mermaid scales.
9. Vacation Nails
If your go-to everyday manicure consists of a pale blush nail color or various takes on nude, opt for colorful polka dot nail for vacation. These just scream summer fun.
10. Matte Nails
Pop a matte top coat on a beachy mani for a seriously modern update to the usual nail art. This design works with any nail color, too. The same design with pink nails? We heart it.
11. Negative Space Waves
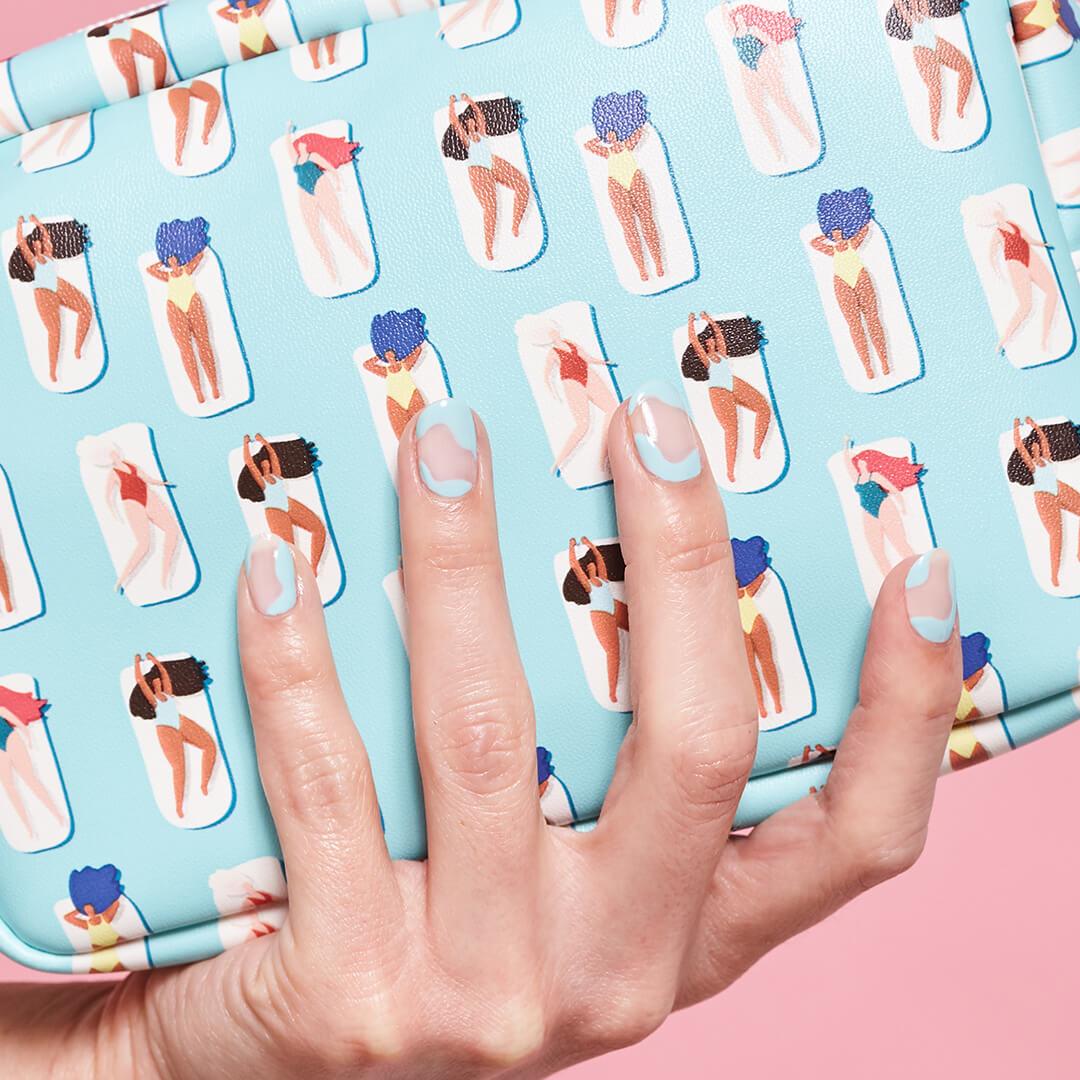

Like the lazy river of manicures, this negative space wave mani is a low-effort, high-impact design. For the tools, you’ll only need a striping brush to help with precision. “A striping brush helps you get close to cuticles without making a mess,” advises Stone. Begin by painting squiggly lines along the walls of your nail bed. You can get creative here by switching up your lines on each nail—the non-uniform quality of this design is what gives it the wow-factor. Once your squiggly lines are in place, fill in the blanks (leaving the middle of the nail bare) with two coats using the brush from your polish bottle. Wait for your handiwork to dry and then apply a top coat to smooth out any unwanted textures in the polish. Go a little too abstract? “If you accidentally paint outside the lines, use a tiny concealer brush dipped in nail polish remover to clean up around the edges,” reassures Stone.
P.S. Any pastel works fab for this look, but we’re obsessed with the baby blue COLOR CLUB Nail Polish in Get Lost or pale aqua HOUSE OF MAKEUP Nail Lacquer in Frozen.
12. Tropical Palms

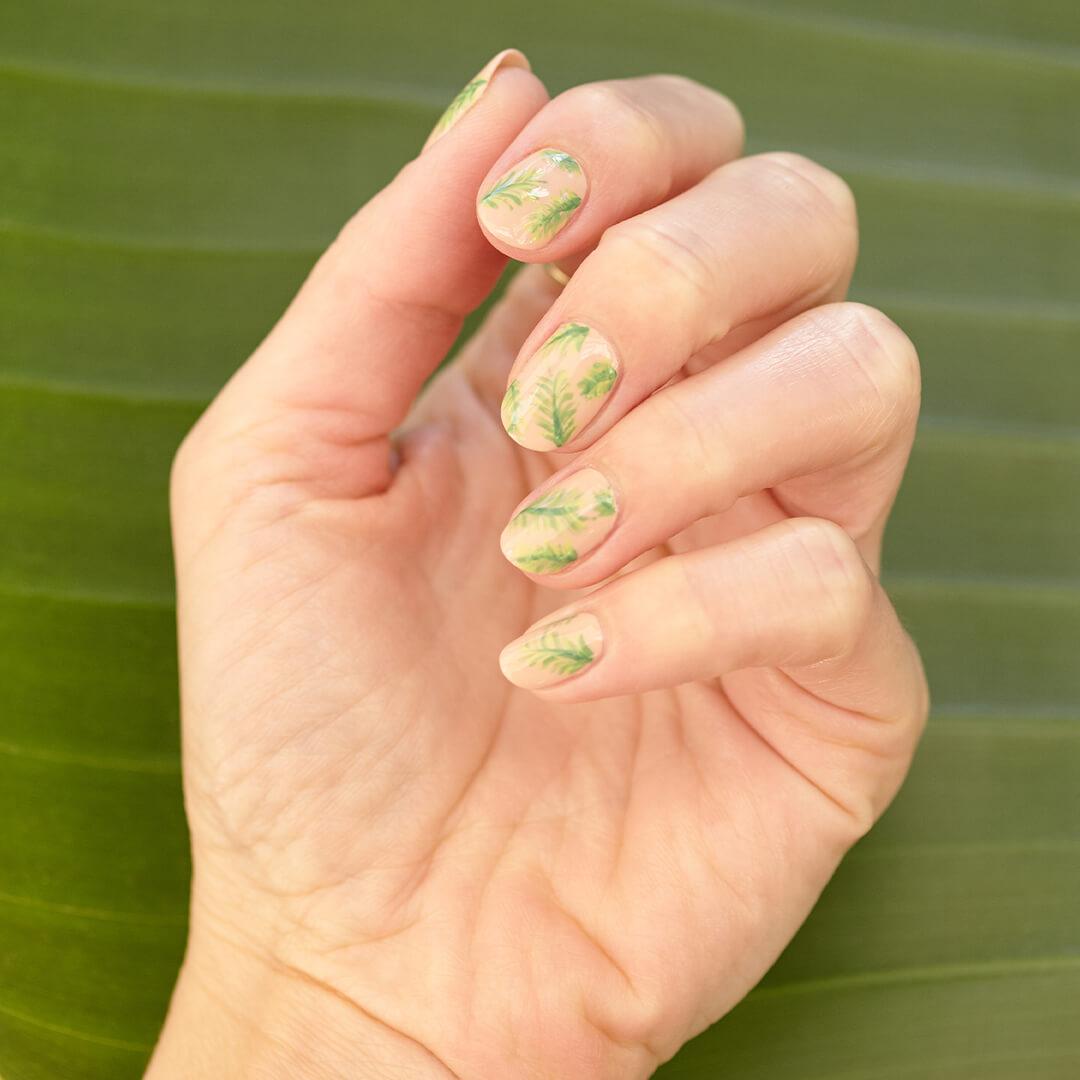
Give your nails the Tulum treatment with a palm frond mani that begs for a beverage with a tiny umbrella. To start, apply a neutral base coat (we used HOUSE OF MAKEUP Nail Lacquer in Flat White), then grab your striping brush and two to three shades of green for the palms. “Using different color greens helps give the look dimension,” adds Stone. “Using a striping brush dipped in your darkest green paint stems coming from all different directions on your nails,” she instructs. Then, paint on the leaves coming out of both sides of the stems. Give your nails a few minutes to dry down and then apply your top coat.
13. Watermelon Slices
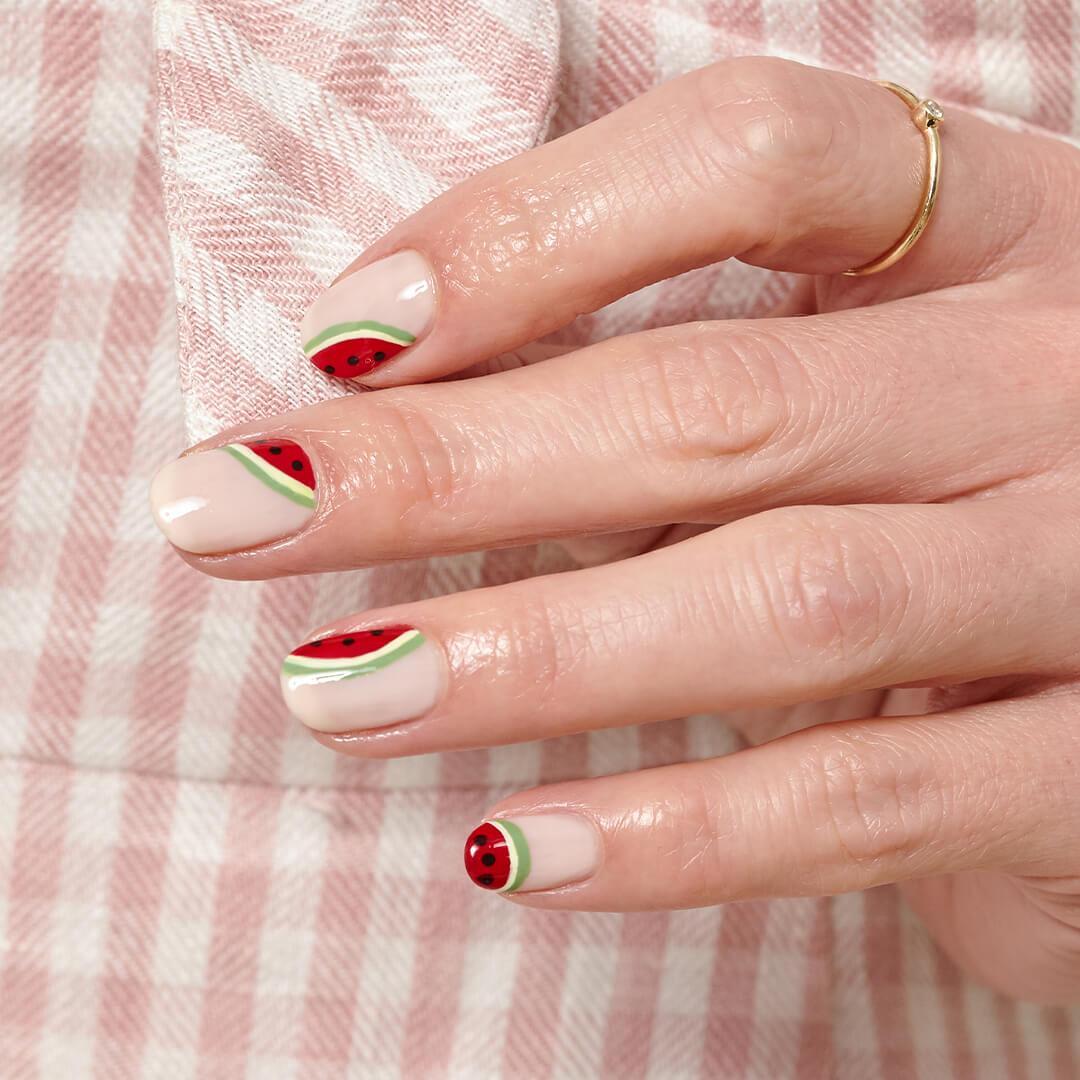

No fruit is more emblematic of summer than watermelon. Give your hands a sweet-and-chic treatment with a little peek of watermelon on each nail. Here’s what you’ll need: Striping brush, dotting tool (you can use a bobby pin for this), a nude base, as well as polishes in black, two shades of green, and red. Our red of choice for this look is COLOR CLUB Nail Polish in Catwalk. Since this look requires a handful of polishes, you might want to add a few drops to a palette to keep them in one place. “If you don’t have a painter's palette, put your polish on a piece of aluminum foil for easy access when using the striping brush or dotting tool,” recommends Stone.
After painting on your nude base, use the brush from your red polish bottle to swoop watermelon slices onto each nail. Then with your striping brush, add on the rind with a stripe of light green closest to the red and darker green on the outside. Reach for your dotting tool (or toothpick or bobby pin), dip into the black polish, and delicately paint on the seeds. Let it dry and finish with your clear top coat. Now, play matchy-matchy and cut up some watermelon IRL.
14. Mermaid Tail

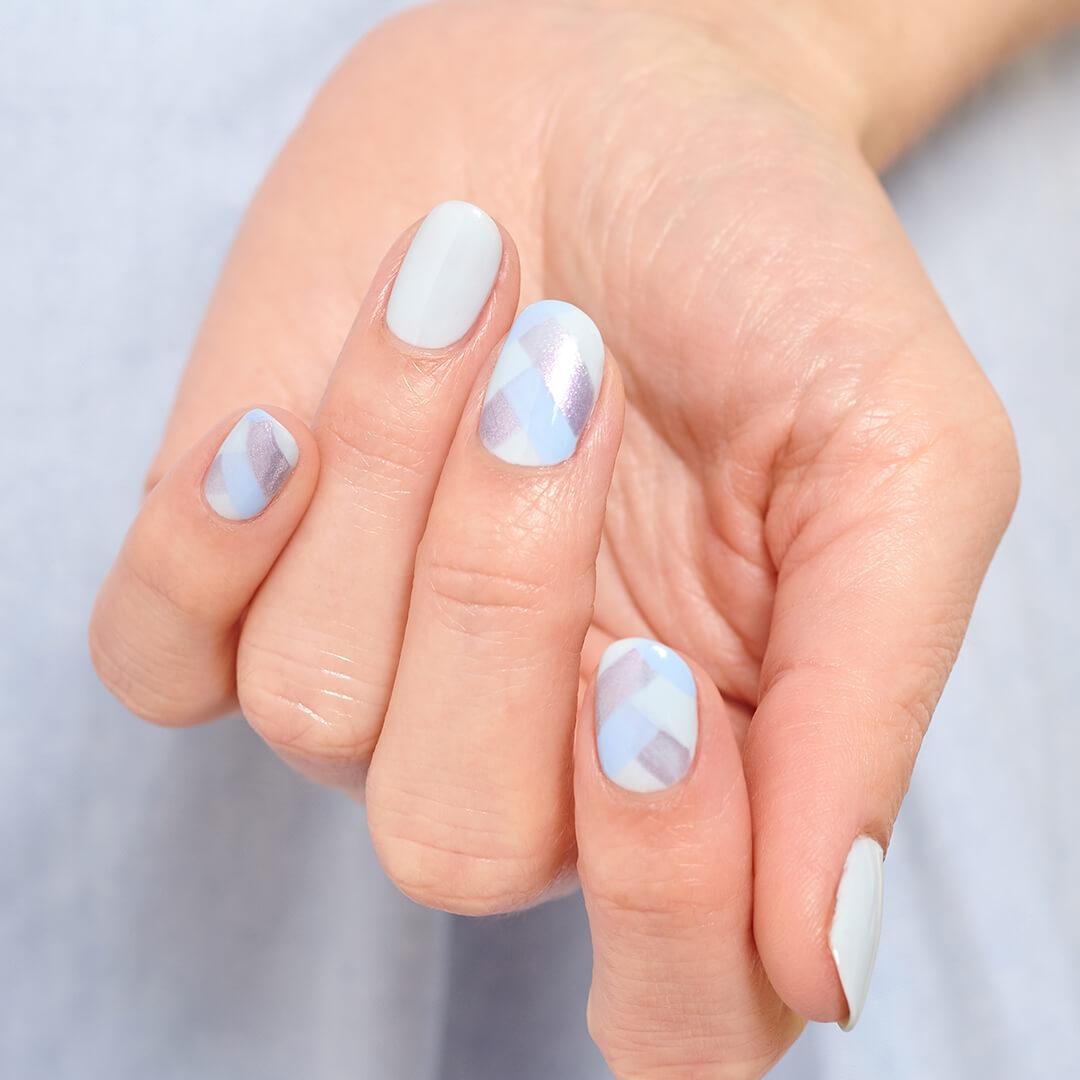
Remember the age you realized you couldn’t actually be a mermaid? Well, put physics aside and let this mermaid tail nail look live your childhood dreams—with a super stylish, grown-up vibe. Bonus: No special tools needed, just a little bit of patience.
Start with two coats of a baby blue shade (we used COLOR CLUB Nail Polish in Get Lost) as your base and let it fully dry before moving onto the tail. Grab two or three complementing shades (you can also incorporate your base shade) and begin to add large diagonal stripes to each nail for a braid-like effect—leaving a few solid nails to break up the pattern. Stone gives a word of caution on moving too fast, “Since you are layering so many polishes, if you try to do it all at once it will get goopy and drag.” So, be sure to let each section of the “braid” dry before moving onto the next layer. As we all know, waiting is the hardest part but we promise it’s so worth it. Seal in your work with a top coat and you’re done! Congrats, you are now Ariel.
15. Sunset Gradient
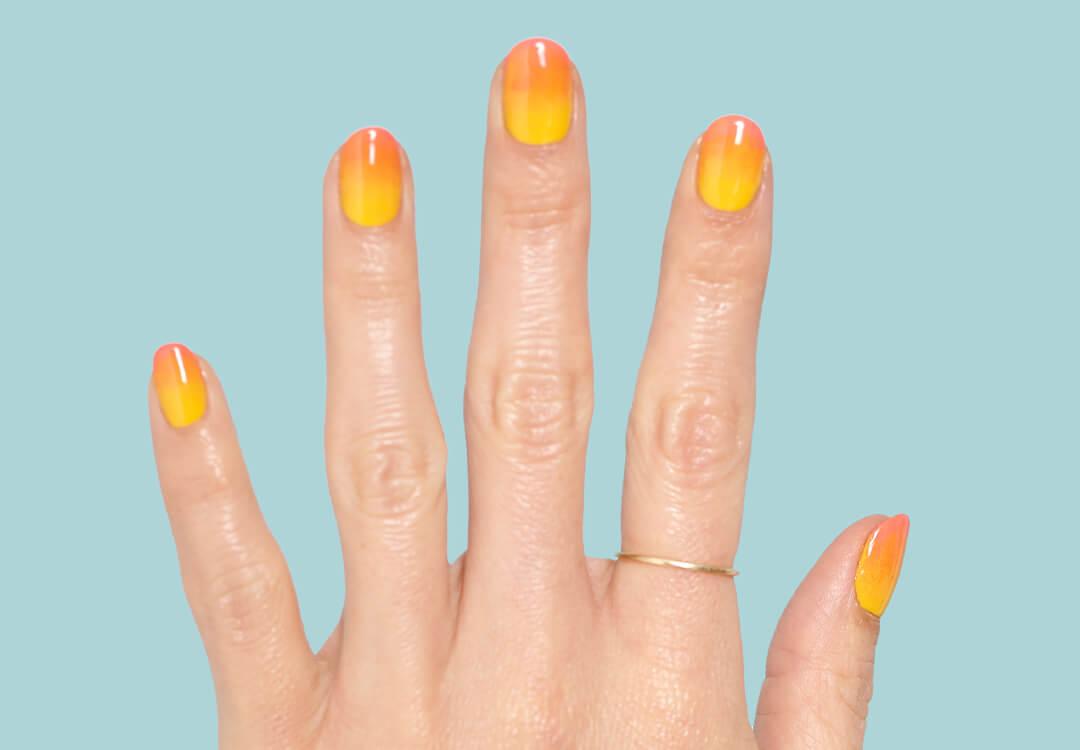

Get inspired by summer’s epic sunsets and opt for a warm-toned gradient. With a palette of yellow, orange, and pink polishes—and a *very important* makeup sponge—you’ll be on your way to ombré in no time. Pro tip: By using colors in the same family (like warm or cool), you’ll be able to make a more seamless fade between each hue.
Use one coat (or two, if necessary) of yellow as the canvas for your sunset and let this dry before starting up with the sponge. Then, paint a horizontal stripe onto the base of your sponge with orange, followed with pink. Gently tap the sponge onto your nails so orange hits about halfway down the nail and pink closest to the free edge. Also, a mess is totally normal!
A small concealer brush dipped in remover will help to quickly clean up any polish on your skin. Of course a top coat is always essential, but in this case it’ll take your gradient work to the next level. “This will really smooth out any texture your sponge may have created,” says Stone. There you have it—instant sunset!
Want More Inspo?
For more beachy nail designs, we took a walk through Stone’s IG feed for the looks we think will reign supreme all summer. These are a few of our faves...
16. Sea Glass Inspired
Combing the beach for sea glass never looked so good. This watery technique in shades of turquoise is perfect for long walks on the beach—or around your neighborhood while thinking about the beach.
17. Minimalist Dots
Perfect for the minimalist at heart, this single dot per nail in slightly muted tones adds just the right hint of color. Plus, with a sheer base nobody will ever know when it finally chips!
18. Rainbow Watercolor
Big watercolor splotches on a white base look like a giant beach ball in the very best way. In short, we’re into it.
19. Sunflowers
The ultimate summer floral = sunflowers. With a dotter tool and your favorite sun-kissed yellow, this design will be done in a snap.
20. Tie-Dye
Anybody else tie-dyeing everything? If you’re out of white clothing to experiment on, try out a tie-dye inspired manicure to get in on the trend.
21. Summer Studs
Catch the rays safely with a line of metallic studs in the center of your nail—you’ll be like a walking disco ball.
22. Classic Nude
Love the skin you’re in so much you make a mani of it. Grab a shade that’s close to your natural tone for a barely-there look that’s perf for warm temps.
23. Azul Gradient
This different take on ombré uses single nails in a gradient for a similar effect. It’s also a great solution for not being able to choose one shade.
24. Neapolitan Lines
Say no to tan lines (wear your sunscreen!), but say yes to these lines in a Neapolitan palette. We can't guarantee it won't give you a craving for an ice cream sandwich...
25. Blue Skies Ahead
Even if you end up caught in a summer storm, one look at this cute cloudy nail art will help remind you that blue skies are coming.
26. Cotton Candy Hues
An ombré manicure that's inspired by spun sugar and food coloring. Yep, it doesn't get any better than that.
27. Summery Color Co-ord
Step one: Grab every shade you own that sparks joy.
Step two: Paint. Them. All.
28. Rainbow French
If you're getting bored with a standard French mani, swap that white shade for a spectrum of skittle-hued tips.
29. Abstract Ocean Arches
This cobalt base is a stunner on its own, but it takes on a modern look when paired with light blue arches.
30. Simple Stars
An ode to summer nights that is still great for daytime? Teeny silver stars on a nude or clear base.
31. Whirlpools
Bring out your inner artist for a marbled mani in shades of blue, grey, and white. Embrace imperfections (like bubbles) and seal them in with a swipe of top coat.
32. Baby Blue French
In case you couldn't tell, baby blue is on deck to be a major summer stunner. Switch up a classic French for a base of blue.
33. Desert-Inspired Cacti
With crystal clear pools, triple digit temps, and a cactus everywhere you look, Palm Springs makes for a great nail art inspo.
34. Water Reflections
On that note, if you can't stop staring at the light refractions in those Palm Springs swimming pools, this might be the mani for you.
35. Beach Towel Stripes
You can't go wrong with stripes in summer months, so take a cue from your beach towel with these multicolored lines.
Upgrade your nail art game with the IPSY Glam Bag! Take our Beauty Quiz now to get started. Already an Ipster? Refer your friends to earn points, which you can use toward products. Either way, don’t forget to check us out on Instagram and Twitter @IPSY.
Like this article? Share it with your friends by clicking the icons below!
Liked this post? Share!
Related Stories


Nails
The Nail Art Trends Set to Take Over 2026
Published on Nov 25, 2025 • 6 min read


Nails
7 Nail Trends We’re Betting on for 2025
Published on Dec 10, 2024 • 6 min read


Nails
How to Apply Fake Nails at Home: A Beginners Guide
Published on Dec 5, 2023


Nails
What You Need to Know About SNS Nail for Your Next Mani Appointment
Published on Oct 6, 2022


Nails
25 Holiday Nail Art Ideas That’ll Make Your Mani the Star of the Season
Published on Oct 16, 2025 • 9 min read


Nails
26 Cute Thanksgiving Nail Ideas to Complete Your Holiday Look
Published on Oct 2, 2025 • 11 min read


Nails
20 Reasons Why We’re Obsessed With Glitter Nails Year-Round
Published on Sep 27, 2025 • 9 min read


Nails
51 Halloween Nail Ideas That Are All Treats, No Tricks
Published on Sep 16, 2025 • 9 min read


Beauty Picked Just for You
Get 5 products worth up to $70
Plus exclusive access to epic deals up to 80% off
Starting at just $14/month. Cancel anytime.