Drag School Is in Session: Drag Queens Share Their Favorite Makeup Techniques


Maddie Aberman

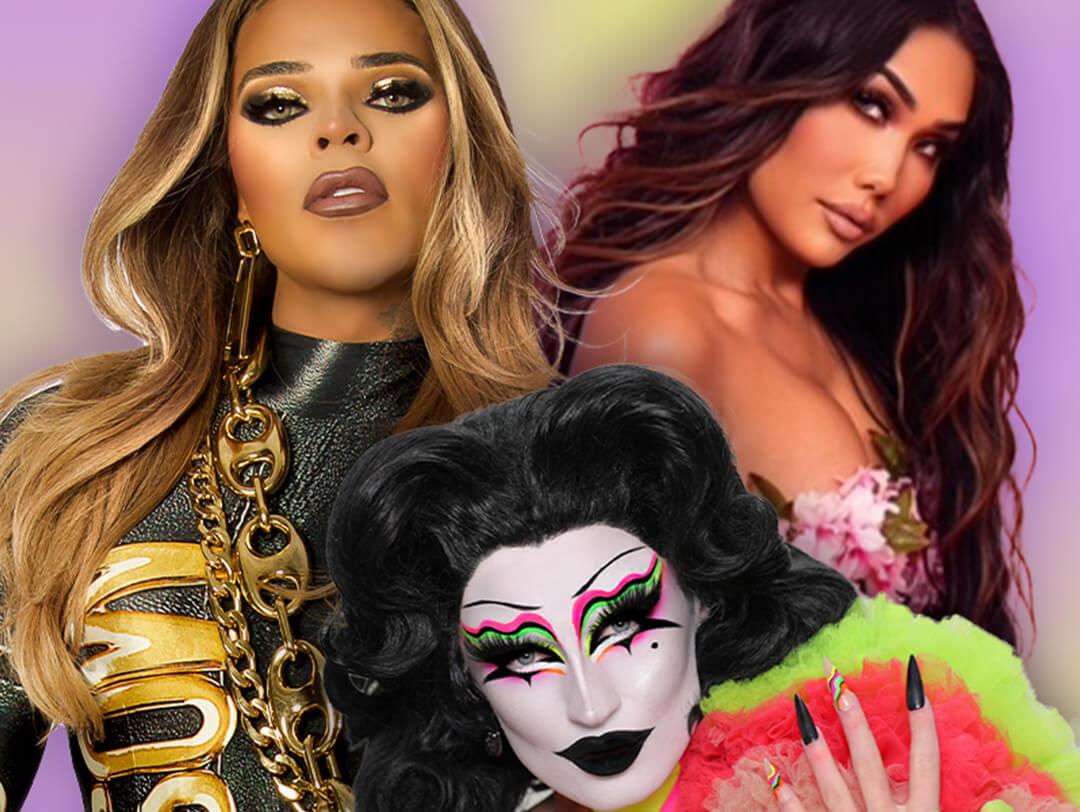
You might have been introduced to contouring from that famous Kim Kardashian striped face photo, you are probably familiar with baking from your favorite beauty creators, and we all know who was responsible for the overlining craze in recent years, but the fact is, these makeup techniques are nothing new.
Did you know many of today’s beauty trends have drag beginnings? Long before they showed up on your Instagram feed, makeup techniques like baking your face, contouring some cheekbones, and overlining your lips were staples in the dressing rooms at clubs and have been passed down through drag generations. Truth is, drag queens are the original beauty influencers, so we tapped our favorite queens to take us through their go-to drag makeup tricks and techniques. Keep scrolling, and grab your makeup brushes. Drag school is officially in session.


It's about glam time you treated yourself.
MEET THE EXPERT
Gia Gunn is a trans showgirl and singer based in Los Angeles. She is most known for her time competing on season 6 of RuPaul’s Drag Race, season 4 of RuPaul’s Drag Race: All Stars, and season 2 of The Switch Drag Race.
Vanessa Vanjie Mateo is a drag performer based in Los Angeles. She was featured in seasons 10 and 11 of RuPaul’s Drag Race as well as spin-offs, including RuPaul's Secret Celebrity Drag Race and RuPaul's Drag Race: Vegas Revue.
Gottmik is a Los Angeles-based drag queen and makeup artist known for her time on RuPaul’s Drag Race season 13.
Contouring With Gia Gunn
Today, contouring has made its way into the makeup routines of everyday women (with the thousands of contour products on the market to back it up), but before the YouTube tutorials and iconic Kim Kardashian contouring Instagram, there were drag queens backstage at clubs chiseling their faces with stage makeup. “Drag performers and trans showgirls, like myself, have been contouring backstage for decades to create whatever face structure we desire,” says showgirl Gia Gunn. “I’ve always contoured to give me that nice snatched look, especially when I’m out there in the spotlight.”
What you’ll need to contour:
Small powder brush (we love F.A.R.A.H. Contour & Blend Brush)
Contour powder or bronzer
How to contour your face like a queen:
1. Find the magic spot.
Gia recommends turning to the side and letting the natural shadows of your cheeks show you where you need to contour. If you can’t find the natural shadow, suck in your cheeks to better expose your natural cheekbones.
2. Define your cheekbones.
Dip your brush into your contour powder, then start dusting it onto the back of your cheekbone near your ear. Work your way down toward your mouth with back-and-forth motions. “Use light pressure on your brush,” says Gia. “If you push too hard it can actually take off some of your makeup underneath.”
3. Blend the line out.
Once you have the cheek contour line in place, use the same brush to blend it upward into your blush. It’s a much more chiseled look to blend it up rather than down, which can look a little muddy.
4. Chisel out your jaw.
“I like to contour the bottom of my jaw to give me that soft and defined, pulled-back look,” says Gia. Dip the brush back into your contour powder, start right underneath your chin, and sweep the brush under your jawline up toward your ear.
5. Blend again.
Are you catching a theme here? The key to drag queen level contour is to blend more than you think you need. Blend your jaw contour down onto your neck, so you don't have harsh lines.
6. Contour your forehead.
“The reason I contour my forehead is to make it appear smaller,” says Gia. “So blend the contour around your hairline from temple to temple.” Use light dabbing motions with your brush here to deposit the color without messing with your makeup underneath.
7. Snatch your nose.
“For nose contour I like to look at myself straight on, so I can see what I'm doing better,” says Gia. Use a smaller brush or pinch the brush you have to get more precise application for the nose. Dip the brush into your contour, then start on the side of your nose just under your brow, and sweep the brush down along the side toward your nostrils. Pro tip: Connect the top of your nose contour with your eyeshadow color for a seamless look.
Baking With Vanjie
Have you ever watched an episode of Drag Race and seen all the queens in the dressing room with tons of powder on their faces? That’s baking (also sometimes called cooking). This beauty technique started in the drag community as a way to lock in their makeup and make their features really pop on stage. “Baking solidifies your makeup, stamps it into position, and makes sure the color stays in place,” says drag queen Vanessa Vanjie Mateo. “It becomes hurricane proof, tornado proof, earthquake proof, storm proof, through-the-trials-and-tribulations proof, through stress, through quarantine, through everything.”
What you’ll need to bake:
Tinted loose powder
Powder puff
Fluffy makeup brush (try F.A.R.A.H. Powder & Go Brush)
How to bake your face like a queen:
1. Tap out the powder.
Tap a good amount of the product into the cap of your loose powder, this way you can use it almost like a palette.
2. Load up your powder puff.
Work the puff into the cap to get it full of powder. When baking, there’s no such thing as too much powder, so feel free to be a bit heavy handed with this step.
3. Define your jaw.
Using the puff, pack the powder along your chin and jawline. Not only does this lock in your makeup, but it also helps to define your cheekbones. The lighter color sits right below your contour (more on that above!) and will help show it off. “This is going to make you look snatched,” says Vanjie.
4. Lock in the center of your face.
Dip your puff back into the powder, then start stamping it above your top lip, around your nose, and the center of your forehead. Basically, anywhere you tend to get oily, hit with some powder. Remember, really load up on powder, you’ll be brushing off the excess later anyway.
5. Make your nose contour pop.
The same way baking helps define your cheekbones, it will help show off any nose contour. “Fold up your puff to make it more precise, and use the powder just down the center of your nose,” says Vanjie. This gives you the same snatched effect as nose highlighter.
6. Time to cook.
Once all your powder is in place, let it work its magic. Leave the powder in place to bake while you finish up your makeup. You can leave it for as long as you want, but make sure it’s on for at least a couple of minutes so it has a chance to lock in.
7. Dust off the excess.
Grab a clean powder brush, and knock off any powder that hasn’t set in. “Make sure you buff it out so you don’t look too crazy,” adds Vanjie.
Overlining With Gottmik
It wouldn’t be drag queen makeup without full, juicy lips. If you’re not born with them, one of the oldest drag queen makeup tricks is overlining your lips. “I love to overline because the smaller the space is between your lip and your nose, the more feminine you look,” says Gottmik. Curious how she gets her signature lip look? Keep scrolling.
What you’ll need to overline your lips:
Lip scrub (Gottmik uses HANALEI Sugar Lip Scrub)
Lip liner 2-3 shades darker than your natural lip color.
Lipstick in any shade you want (we love the rosy tint of LOTTIE LONDON Slay All Day Liquid Lipstick in So Good)
Nude gloss (Gottmik is wearing ANASTASIA BEVERLY HILLS Lipgloss in Toffee)
How to overline your lips like a queen:
1. Prep your lips.
A good base means your lip look is flawless and lasts all night, says Gottmik. Start with a sugar-based scrub, and work it over your lips in small circular motions to get rid of any dry skin and create a smooth surface.
2. Find the right lip liner.
To help create the illusion of fuller lips without an obvious lip line, choose a lip pencil that is two to three shades darker than your natural lip color. This will help create the shadow that naturally full lips have. Don’t worry if it looks dark as you go, once you top with more products (like lipstick and gloss) it balances out.
3. Create a guide.
To help make sure the lip shape is even and exactly where she wants it, Gottmik draws a small line on the outer corners of her lips toward her ears (almost like The Joker smile lines). This creates a guide for where you want the overlines to meet.
4. Start at your Cupid’s bow.
The easiest way to create the best overlined look is to follow the shape of your natural cupid’s bow (only draw the liner above your natural lip line) and connect the line with the end of the dash you drew earlier. How much you overline is totally up to you. You can go major, like Gottmik, or trace it just slightly over your natural lip line for a subtle, everyday look.
5. Overline your bottom lip.
For the bottom lip, Gottmik likes to start at the end of those outer corner dashes, and connect it to the center of her bottom lip. Again, how far below your natural lip line you draw is totally a matter of preference.
6. Fill in the gap.
Using the same liner, fill in the gap between your natural lip’s edge and the new outline you’ve drawn. This will help disguise the overdrawn area and create more of that natural-looking shadow you want.
7. Add your lipstick.
Swipe on your lipstick, keeping the majority of color mostly in the center of your lips. You don’t want to overlap the overline too much because that can take away from the optical illusion of it all. To help blend the lipstick with your line, Gottmik uses her finger to gently dab and blend.
8. Top it off with a gloss.
“I like to swipe it all over to help melt the whole look together,” says Gottmik. Plus, the light-reflecting quality of a lip gloss helps add even more dimension to your look.
Want to experiment with your look but don’t know where to start? Take our Beauty Quiz now to get your very own IPSY Glam Bag. Already an Ipster? Refer your friends to earn points, which you can use toward products. Either way, don’t forget to check us out on Instagram and Twitter @IPSY.
Like this article? Share it with your friends by clicking the icons below!
Liked this post? Share!
Related Stories
How-To
Blush 101: Your Go-To Guide on How to Apply Blush for Your Face Shape
Published on Dec 12, 2025 • 12 min read
How-To
How to Apply Eyeshadow: A Beginner’s Guide to Flawless Eye Looks
Published on Dec 4, 2025 • 10 min read


How-To
How to Do Winged Eyeliner Like a Pro (No Steady Hand Required)
Published on Dec 3, 2025 • 9 min read
How-To
Try a Soft Goth Aesthetic This Season to Evoke Your Inner Wednesday Addams
Published on Feb 23, 2023


How-To
Everything You’ve Ever Wanted to Know About Mastering the Art of Bronzer
Published on Nov 5, 2025 • 10 min read


How-To
Blush Sticks 101: How to Apply Them and the Best Blush Sticks to Use
Published on Nov 5, 2025 • 13 min read


How-To
How to Treat Yourself: 39 Simple Self-Care Ideas
Published on Oct 22, 2025 • 15 min read


How-To
How to Cover Melasma With Makeup Like a Pro in 4 Simple Steps
Published on Sep 26, 2025 • 5 min read


Beauty Picked Just for You
Get 5 products worth up to $70
Plus exclusive access to epic deals up to 80% off
Starting at just $14/month. Cancel anytime.