Not Sure How to Apply Stick Foundation? Follow These Steps From a Celeb MUA


Ashley Locke

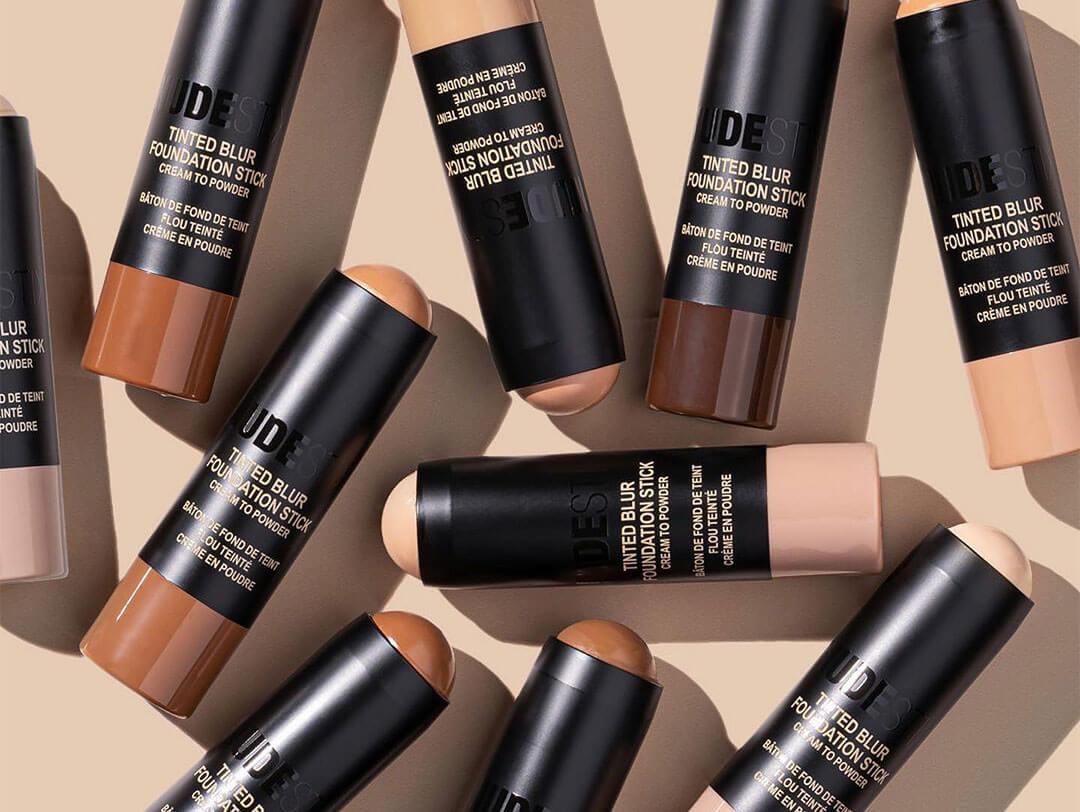
You can use numerous types of foundations in your makeup routine to achieve a full-coverage makeup look. From liquid foundation to powder foundation, the options are endless. One of our personal favorite makeup products (and one we consider to be often overlooked) is the trusty foundation stick. A cream foundation that usually comes in a twist-up tube, this product is the best foundation option for those who need to quickly apply their base before heading out the door. Our other fave benefits of stick foundation? It offers buildable coverage with a lightweight consistency and is multifunctional, which means you can use it as a concealer for blemishes and dark circles, and it can even be used as a contour or highlighter. Did we mention they can sometimes offer skincare benefits as well? What can’t a foundation stick do?
We swear by stick foundation if you couldn’t already tell, and we’re guessing you either do too or are just being introduced to the wonders of this versatile makeup product. Either way, we wanted to offer a tutorial on how to apply stick foundation so you can achieve a flawless foundation application and get the most out of this adaptable product. Read on for a step-by-step guide from a celebrity makeup artist.


It's about glam time you treated yourself.
MEET THE EXPERT
Carolina Benita is a celebrity makeup artist who has worked with Kylie Jenner, Kim Kardashian, Matilda Djerf, and more.
How to Apply a Stick Foundation Like a Celebrity Makeup Artist
Step 1: Find the Right Foundation Shade for Your Skin Tone and Skin Type
Before you even apply a stick foundation to your complexion, it’s important to ensure you’re using the right one for your skin tone and skin type. When it comes to finding the right shade for your skin tone, you can always visit a makeup store like Sephora or Ulta to discover your perfect shade match. Celebrity makeup artist Carolina Benita suggests buying “three different shades of stick foundation for contouring and highlighting for a cohesive look.” She notes that you can also mix them as the seasons change to better color match your complexion.
Let’s quickly dive into finding the right foundation stick for your skin type. Benita recommends oily skin types reach for a product that is oil-free and/or mattifying, like the PÜR 4-in-1 Foundation Stick Cream-to-Velvet Matte Foundation.
Dry skin types should go with a hydrating foundation stick that offers a dewy finish. We love the DOLL 10 BEAUTY Precision Concealer for our dry skin because it contains nourishing peptides and hyaluronic acid to keep our skin hydrated all day long. It’s also a great option for those with mature skin who want a flawless finish.
Have sensitive skin? “Opt for a foundation that is fragrance-free and hypoallergenic,” says Benita. The NUDESTIX Nudies Tinted Blur is great for sensitive skin types because it contains moisturizing green tea and vitamin E to protect the skin barrier without causing irritation.
Combination skin would benefit from “a balanced formula that provides hydration without being too greasy,” notes Benita. We recommend the BOBBI BROWN COSMETICS Skin Foundation Stick because it offers weightless medium-to-full coverage without leaving a cakey finish. Plus, it comes in an endless array of foundation shades that’ll match any skin tone.
Step 2: Prep Your Skin Correctly
Now that you’ve found the right stick foundation for your skin tone and skin type, it’s time to start the application process. As always, prep work is critical. “Start with a clean, moisturized face,” says Benita. “If you use serums, let each serum dry before applying the next one, and let the skincare sink into the skin for at least 10 minutes before starting to apply your makeup.” Once your skincare is applied and fully absorbed into your skin, don’t forget to apply sunscreen if your moisturizer doesn’t already contain SPF. Let that absorb completely before moving on to the next step.
Step 3: Warm Up the Foundation Stick
You may think that because it comes in a stick, you can apply the foundation directly to your skin. While you can, you’ll achieve better coverage if you warm up the product beforehand. Benita says you should rub the foundation on the back of your hand to make it easier to blend. She then uses her fingers or a foundation brush to apply the foundation to the skin. The makeup artist recommends using a synthetic foundation brush so it doesn’t “eat up” all of the product on the back of your hand. The BILLION DOLLAR BROWS Foundation Brush is one of the best for applying foundation for that very reason. This was one of the first brushes we used as beginners, and we still can’t recommend it enough.
Step 4: Apply the Foundation in Sections
Benita offers an essential makeup tip by sharing that it's important to stipple or dab the foundation brush “into the product a few times to make sure the brush has equally as much product throughout the brush to prevent an uneven application.” When the brush has an even amount of product, you can apply it to the face in circular motions for a more even finish.
Step 5: Follow Up With a Beauty Blender
For a more flawless-coverage foundation, Benita recommends going in with a damp beauty blender to even out any creasing and minimize the appearance of fine lines. Doing this will also help “remove excess product and press the product into the skin.”
Step 6: Build Up Coverage If Needed
Feeling like you want a little more coverage? Follow steps 3 through 5 to add a thin layer of foundation to your skin. Benita says it’s critical to only apply foundation where you feel you really need it.
Step 7: Conceal Blemishes and Under-Eye Darkness
Now that your base is complete, you can conceal blemishes and any darkness in your under-eye area. To use as a concealer, Benita says to “use a smaller brush and lightly press on the product to the blemish, let it sit for a little bit, and then use a small fluffy brush to blend the edges.” The F.A.R.A.H Concealer Brush 10F Rose Gold Collection makes covering dark spots and acne a breeze.
To conceal the under-eye area, you may first need to start by applying a color corrector. We highly recommend the V KOSMETIK High Def Under Eye Color Corrector because it offers seamless color correction for brown spots and dark circles while offering buildable, medium-to-full coverage which serves as the perfect base for concealer. Next, Benita shares that you'll want to use “a foundation stick one to two shades lighter than your skin tone to give a brightening effect” under your eyes.
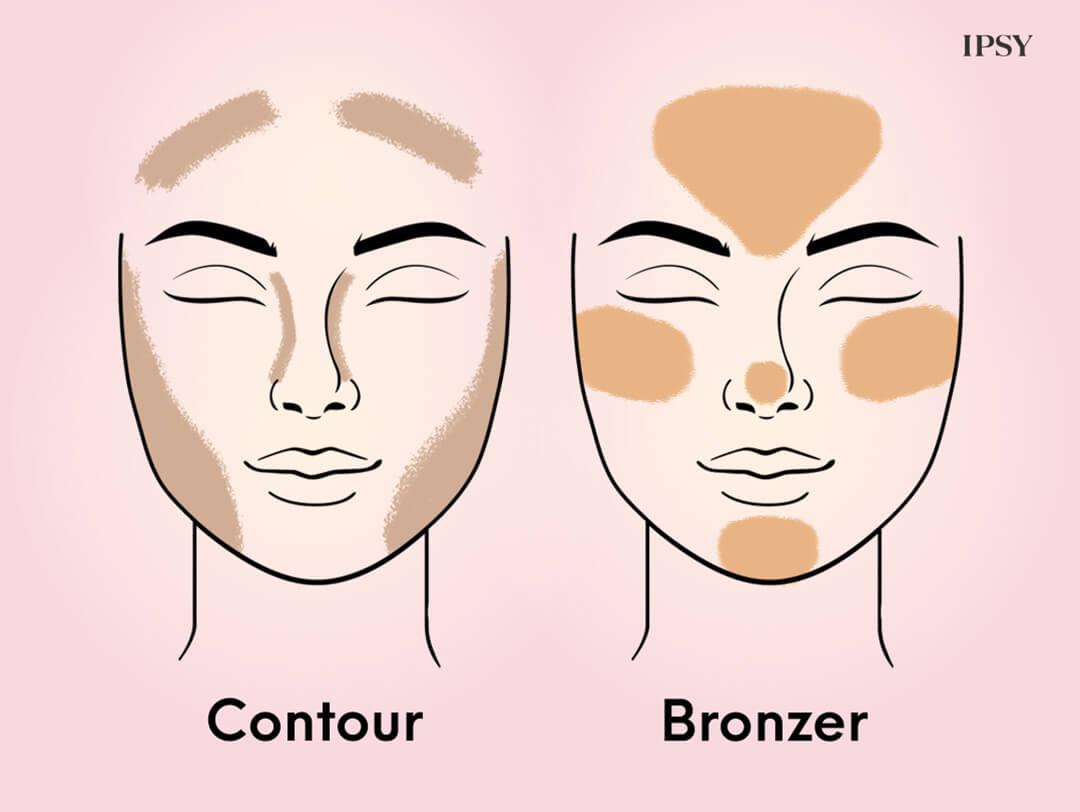
Step 8: Contour and Highlight
Again, one of the draws of a foundation stick is its versatility. You can use it as a foundation, concealer, contour, and highlighter. If you’re looking to use it as a contour, start with a shade that’s one to two shades darker than your go-to shade. You can then “contour your forehead, cheekbones, nose, and jawline, and blend with a smaller brush than the foundation brush,” says Benita. We cannot recommend the GIGI GORGEOUS The Gorgeous Contour Brush enough for this step. It has been a staple in our makeup routines since it first launched in 2019. Yes, we love it that much.
To highlight with a foundation stick, you can use the same shade that you used as a concealer to “highlight under the cheekbones, on the bridge of your nose, chin, under your brow,” and wherever else you’d like to highlight, says Benita.
Step 9: Set Your Foundation
Your base is complete—now what? It’s time to set it before continuing on with the rest of your makeup look. If you feel like your base is too dry, Benita suggests misting your complexion with a hydrating setting spray (like the KAB COSMETICS Hydrating Setting Mist) before going over the look with a makeup sponge.
“Then, apply powder to ensure that the foundation will last all day,” she says. Leave the setting powder on for five to 10 minutes before dusting the excess off.
Step 10: Complete Your Makeup Routine
You’ve finished applying foundation, concealer, contour, and highlighter, so now you can move on to the rest of your makeup look, whether that includes just mascara or a full beat. Pro tip: If you plan on applying eyeshadow, Benita says you can use the foundation as a base. “Apply a small amount to your eyelids and blend it out,” she says. “This creates a smooth, even base that helps your eyeshadow colors pop and last longer.”
Step 11: Set the Final Look
After all that work, you can’t forget to set your final look with a little bit of setting powder and setting spray. We like to set our whole face with the BASIC BEAUTY Setting Powder for no more than five minutes before dusting it off and finishing with the SHADES BY SHAN The Setting Spray. This duo ensures a flawless, creaseless finish that lasts at least 12 hours.
Want the best stick foundations for you delivered right to your door? Take our Beauty Quiz now to get started with your own IPSY beauty subscription. Already an IPSY member? Refer your friends to earn points, which you can use toward products. Either way, don’t forget to check us out on Instagram and TikTok @IPSY.
Like this article? Share it with your friends by clicking the icons below!
Liked this post? Share!
Related Stories

Makeup
Want an IRL Filter? These Are the Best Blurring Foundations
Published on Dec 12, 2025 • 5 min read
Makeup
How to Expertly Apply Eyeshadow on Mature Skin
Published on Dec 10, 2025 • 6 min read

Makeup
How to Use Bronzer and Contour to Sculpt Your Face Like a Pro
Published on Dec 5, 2025 • 9 min read


Makeup
Makeup for Older Women That Works With Your Skin, Not Against It
Published on Dec 1, 2025 • 12 min read


Makeup
2026’s Biggest Makeup Trends Are a Maximalist Dream
Published on Dec 1, 2025 • 8 min read


Makeup
2025’s Biggest Makeup Trends: Go Big or Go Home
Published on Dec 13, 2024 • 7 min read


Makeup
16 New Year’s Eve Makeup Ideas to Fashionably Ring in 2026
Published on Nov 25, 2025 • 10 min read


Makeup
Your 2026 Beauty Horoscope Is Here—and the Stars Are Serving Looks
Published on Nov 25, 2025 • 9 min read
Beauty Picked Just for You
Get 5 products worth up to $70
Plus exclusive access to epic deals up to 80% off
Starting at just $14/month. Cancel anytime.