Nose Contouring 101: An Easy Tutorial for Beginners


Elizabeth Denton

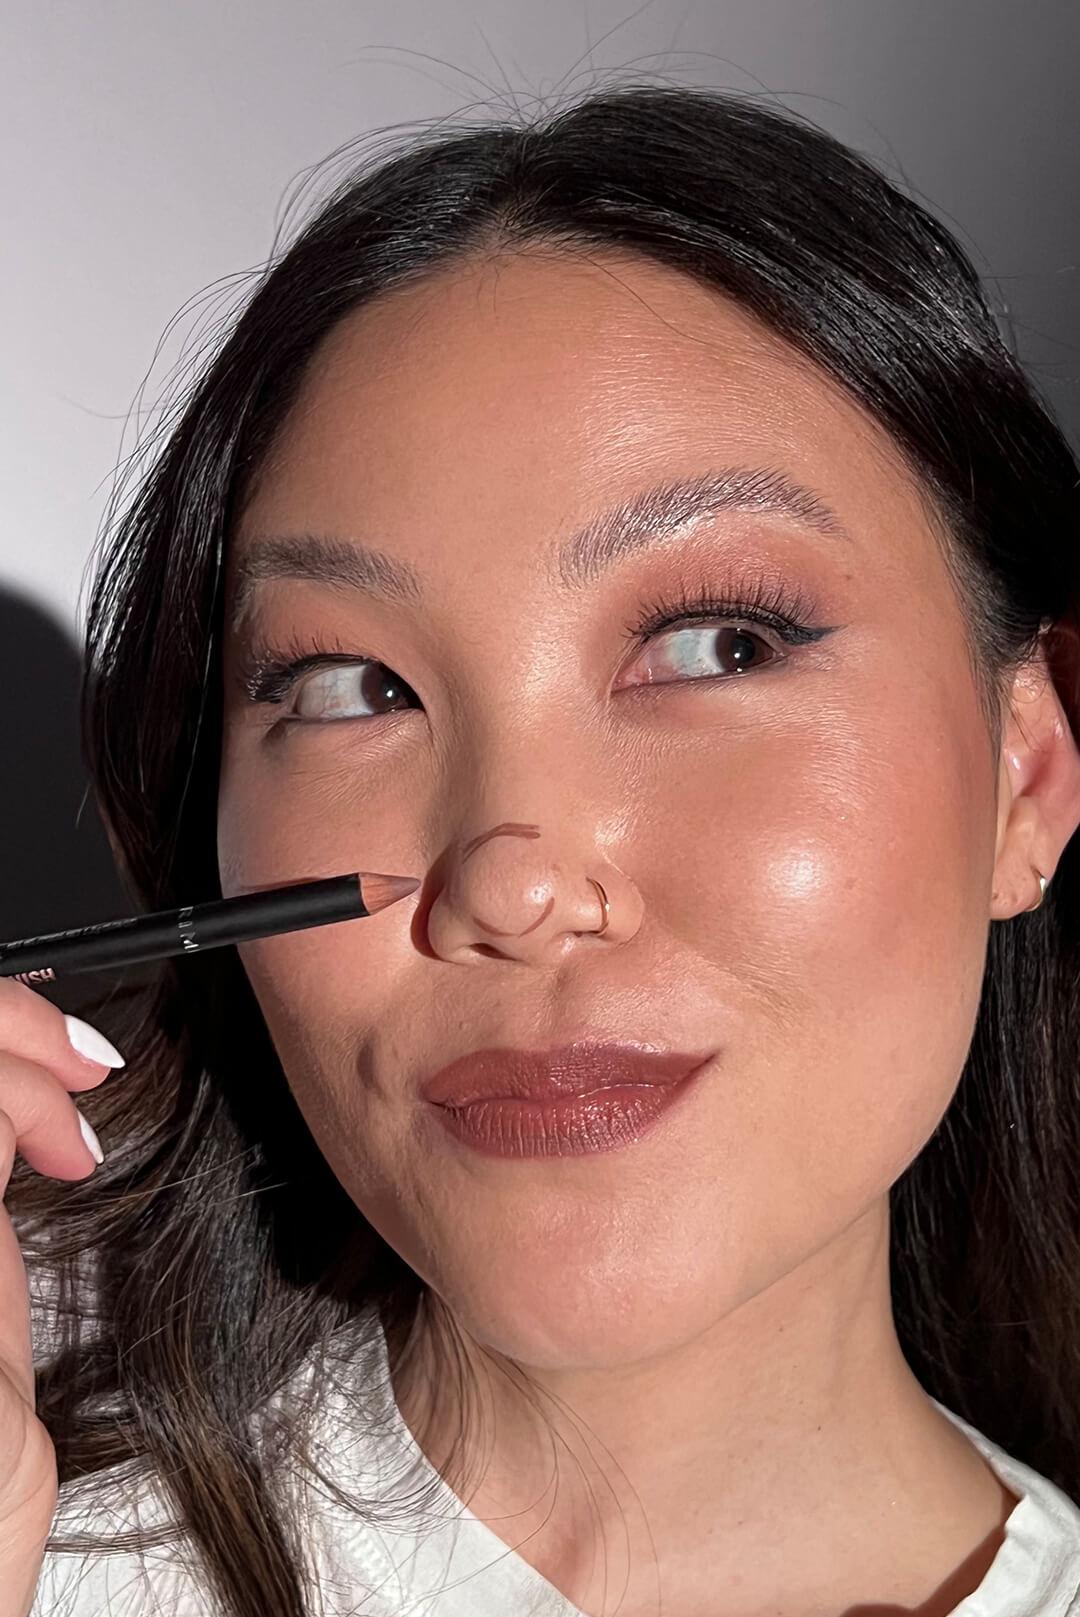
Contouring your nose can be a tricky task, but with the right technique, you can create the illusion of a perfectly shaped nose (if that’s what you’re going for!). Nose contouring has become more popular in recent years as celebs such as Kim Kardashian and her just-as-famous sisters share their makeup techniques to TikTok and Instagram.
When it comes to contouring, it's important to choose the right contour products and tools. And while we all have a different skin tone and nose shape, there is a general nose contour tutorial for beginners you can follow to master a faux nose job. So, we enlisted makeup artist Simone Otis to help with the step-by-step tutorial.


It's about glam time you treated yourself.
MEET THE EXPERT
Simone Otis is a makeup artist and beauty lead for 19/99.
How to Contour Your Nose
1. Choose Your Contour Makeup
Typically, you'll want to use a matte bronzer or a cool-toned contour powder that's two shades darker than your skin tone. Otis prefers one without any shimmer for the most natural look, such as 19/99 BEAUTY’s Cream Contour Sticks. She likes cream contour products over contour powders for beginners. “Using a cream product to contour with makes it easy to get the look you want while also looking natural, as you can easily blend the product to get a skin like effect,” she says. Contour palettes can be especially helpful in finding the exact shade for your natural skin tone. We love ICONIC LONDON Multi Use Cream Contour Palette.
2. Pick Your Contouring Tools
When it comes to your tools for nose contouring, a small, angled makeup brush or a blending brush (or even your fingers!) will work well to apply and blend the product into the narrow areas of your nose. We suggest something like SLMISSGLAM M15 Small Blending Brush in Gray Marble.
3. Draw Straight Lines Down the Bridge of Your Nose
“Starting at the top of the nose near where the eyebrow begins, apply a [thin line] of the contour color going down towards the tip of the nose,” Otis says. Repeat on the other side of the bridge of your nose. You want these contour lines to be as straight as possible and as thin as possible for a sculpted look.
4. Contour the Tip of Your Nose
Don’t forget the tip of the nose. Otis says to apply a slightly curved line towards the tip for a cute rounded nose look. You can also apply the contour product under the tip to shorten the nose, if you so choose.
5. Blend, Blend & Blend Some More
To ensure there are no harsh lines, “use a fluffy brush or your fingertips to blend the lines of contour that you’ve applied,” Otis says. Be sure to blend the color on the bridge of the nose down the sides of the nose, creating the illusion of a thinner bridge.
6. Highlight for a More Sculpted Look
Use a bright concealer or a soft highlighter to apply a very thin line down the bridge of your nose, Otis says. This draws more attention to that area, making the whole nose look smaller. We love MOTD COSMETICS Highlighting Powder in Something Magical.
7. Set Your Work
If you have oily skin, you know the power of setting powder. Keep your cream contour from moving with a setting powder like YC COLLECTION Loose Setting Powder. For an advanced, sculpted look, apply the setting powder to the sides of your nose next to your contour lines. Let it sit, baking for a few minutes, and then brush it off with a fluffy brush.
Want to try the latest beauty trends and products? Take our Beauty Quiz now to get started with your own IPSY beauty subscription. Already an IPSY member? Refer your friends to earn points, which you can use toward products. Either way, don’t forget to check us out on Instagram and TikTok @IPSY.
Like this article? Share it with your friends by clicking the icons below!
Liked this post? Share!
Related Stories
Makeup
Want an IRL Filter? These Are the Best Blurring Foundations
Published on Dec 12, 2025 • 5 min read
Makeup
How to Expertly Apply Eyeshadow on Mature Skin
Published on Dec 10, 2025 • 6 min read

Makeup
How to Use Bronzer and Contour to Sculpt Your Face Like a Pro
Published on Dec 5, 2025 • 9 min read


Makeup
Makeup for Older Women That Works With Your Skin, Not Against It
Published on Dec 1, 2025 • 12 min read


Makeup
2026’s Biggest Makeup Trends Are a Maximalist Dream
Published on Dec 1, 2025 • 8 min read


Makeup
2025’s Biggest Makeup Trends: Go Big or Go Home
Published on Dec 13, 2024 • 7 min read


Makeup
16 New Year’s Eve Makeup Ideas to Fashionably Ring in 2026
Published on Nov 25, 2025 • 10 min read


Makeup
Your 2026 Beauty Horoscope Is Here—and the Stars Are Serving Looks
Published on Nov 25, 2025 • 9 min read


Beauty Picked Just for You
Get 5 products worth up to $70
Plus exclusive access to epic deals up to 80% off
Starting at just $14/month. Cancel anytime.